
Your high-end product is only as safe as the final hands that pack it, yet many manufacturers treat the pack-out station as an afterthought rather than an engineering discipline. You likely know the frustration of inconsistent assembly where a misplaced foam insert leads to a shattered component or a shipping bottleneck that stalls your entire operation. Wasted warehouse space and unorganized components only add to the professional stress of managing a busy production line. Learning how to assemble custom packaging kits isn’t just about moving faster. It’s about creating a repeatable, standardized system that protects both your bottom line and your reputation.
With 2026 regulations like California’s SB 54 and the EU’s Packaging and Packaging Waste Regulation mandating stricter waste limits, the need for precision is more urgent than ever. We’ll help you master the systematic assembly of multi-material kits to reduce labor costs and eliminate transit damage. This guide provides a roadmap to streamline your production line, ensuring every shipment looks professional and arrives intact. We’ll examine how to organize components, optimize your workflow, and leverage engineered protection to create a more efficient logistical flow.
Key Takeaways
- Learn why engineered multi-material systems, combining heavy-duty corrugated boxes with precision foam inserts, provide superior protection for high-value industrial parts.
- Discover Lean workspace strategies that reduce labor costs by staging components to eliminate unnecessary movement during the pack-out process.
- Master a repeatable, standardized workflow for how to assemble custom packaging kits to ensure consistent structural integrity and professional presentation.
- Implement visual management systems and quality control checks to identify missing components instantly and prevent shipping errors before they leave the dock.
- Explore how managed kitting programs and local next-day delivery in Southern California can streamline your supply chain and free up valuable warehouse space.
Understanding the Components of an Industrial Custom Packaging Kit
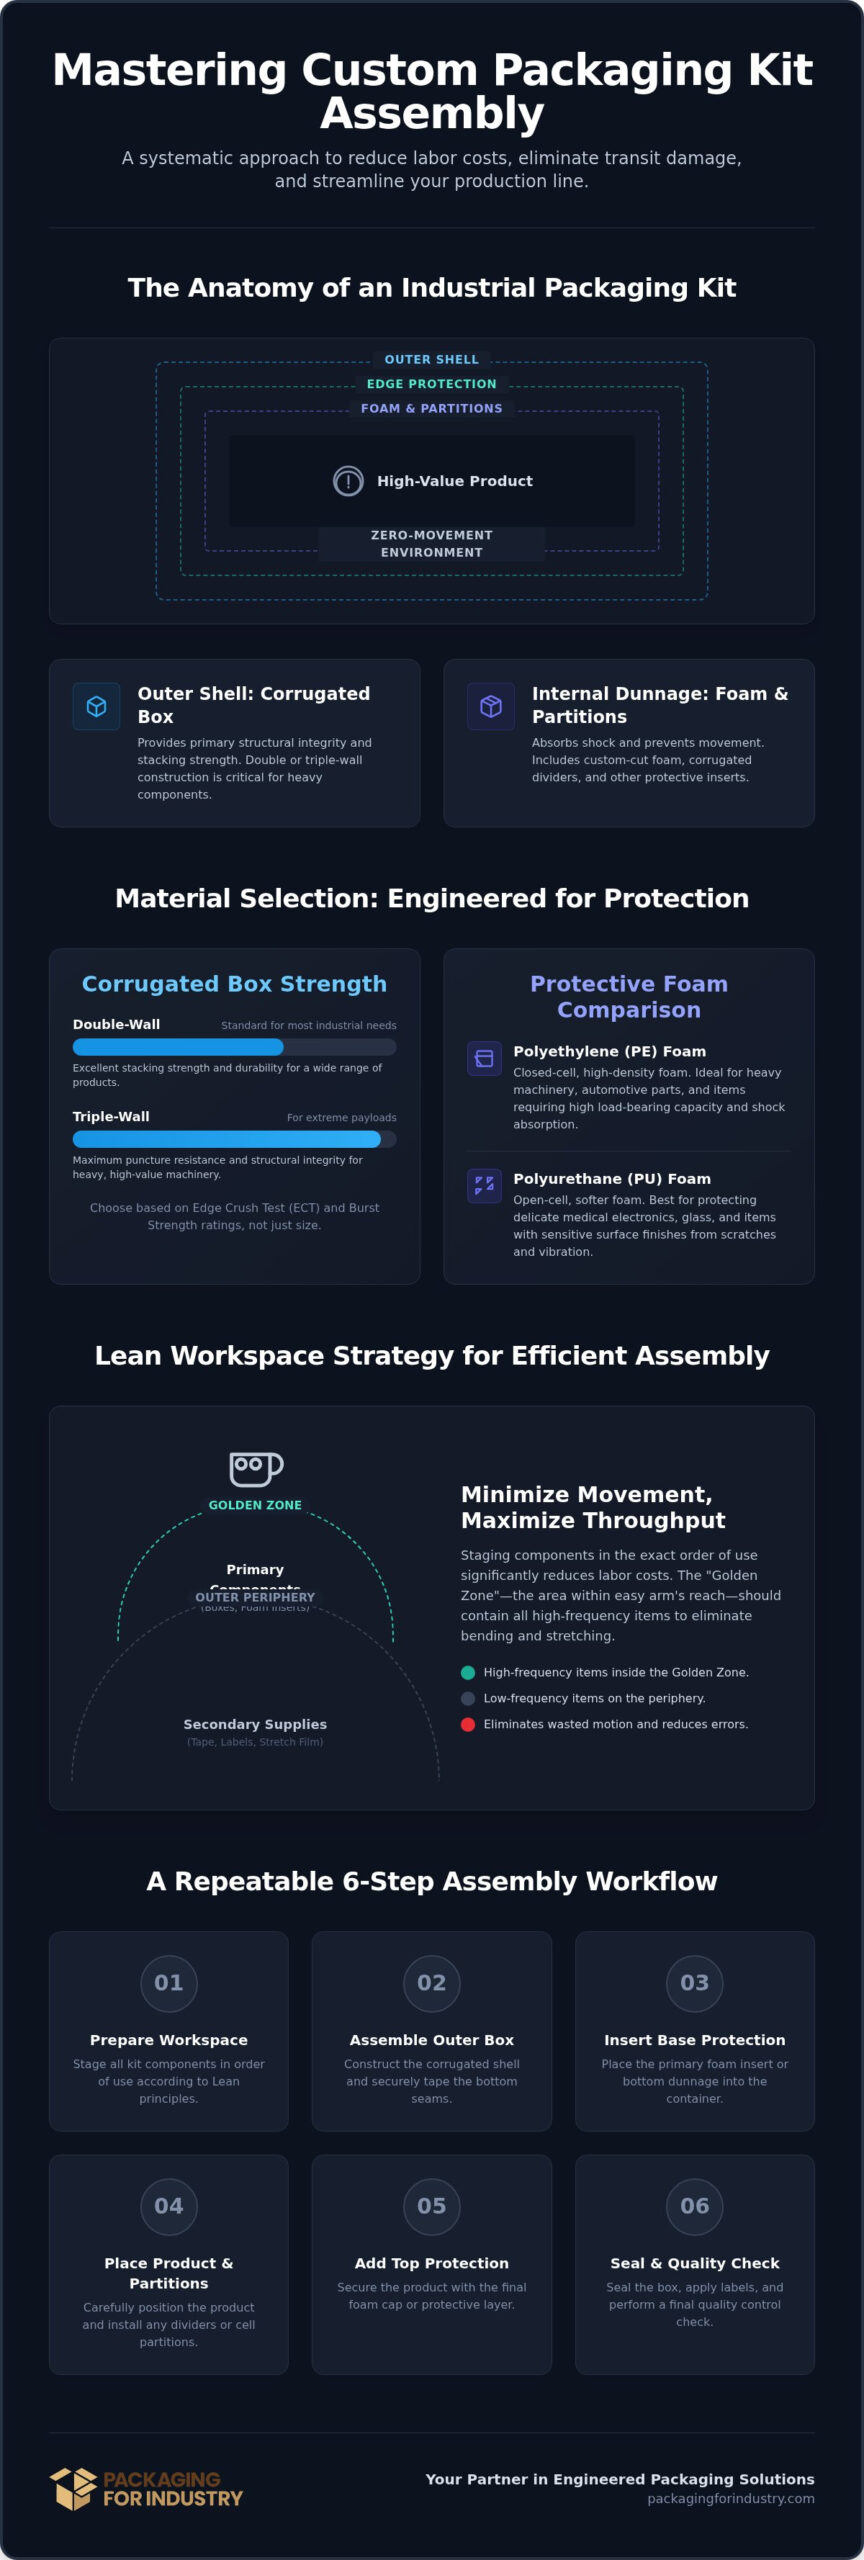
An industrial packaging kit is a pre-planned set of components designed for a specific SKU. It operates as a multi-material system where each element performs a specific protective function. While many operations start by looking at a standard shipping container, the technical definition of kitting involves the assembly of separate but related items into a single unit. For high-value sectors like aerospace or medical device manufacturing, a standard box often fails because it lacks the structural synergy required to prevent movement. Engineered kits succeed by integrating the outer container with custom internal dunnage to create a zero-movement environment.
When you train your team on how to assemble custom packaging kits, you ensure that every material works in tandem. A kit isn’t just a box; it’s a combination of heavy-duty corrugated, precision-cut foam, and often corner or edge protection. This systematic approach eliminates the guesswork for your warehouse staff and guarantees that high-value parts are secured according to engineering specifications rather than employee intuition.
- Double-wall corrugated: Provides the primary structural integrity and stacking strength.
- PE/PU Foam: Offers shock absorption and surface protection tailored to the product weight.
- Partitions and Dividers: Create individual cells for multi-component shipments.
- Edge Protection: Reinforces the vertical strength of the kit for palletized transport.
The Outer Shell: Corrugated Box Selection
The foundation of any kit is the outer shell. You shouldn’t choose a box based on size alone. Instead, focus on the Burst Strength and Edge Crush Test (ECT) ratings. These metrics determine if the container can withstand the rigors of stacked transit and rough handling. For heavy industrial components, we typically recommend corrugated boxes with double-wall or even triple-wall construction. Double-wall provides the necessary stacking strength for most manufacturing needs, while triple-wall is reserved for the most extreme payloads where puncture resistance is non-negotiable. Using the correct board grade ensures the base of the kit doesn’t buckle under the weight of the internal components.
Internal Dunnage: Custom Foam and Partitions
Internal components keep the product stationary and absorb impact. Polyethylene (PE) foam is a closed-cell material that offers high load-bearing capacity, making it ideal for heavy machinery or automotive parts. In contrast, Polyurethane (PU) foam is softer and better suited for protecting delicate medical electronics or glass. When shipping high-volume component sets, corrugated or plastic partitions create individual cells that prevent parts from impacting one another. Integrating custom foam packaging ensures the product is suspended in a way that absorbs shock before it reaches the item. Understanding how to assemble custom packaging kits with these materials reduces labor hours by providing a clear, intuitive path for the pack-out operator.
Preparing Your Workspace for Efficient Kit Assembly
Efficiency in industrial kitting is won or lost at the workstation. To maximize throughput, you must adopt a Lean manufacturing mindset where every movement has a purpose. Staging your components in the exact order of use reduces the physical travel time for an operator’s hands, which can save seconds per unit. Over a high-volume run, these seconds translate into significant labor cost reductions. Optimizing the physical layout of your station is essential for modern warehouse management because it directly impacts your daily throughput and reduces the risk of assembly errors.
A critical concept in workspace design is the “Golden Zone.” This is the semi-circular area within easy reach of an operator’s arms without requiring them to bend or stretch. When you determine how to assemble custom packaging kits at scale, keep your high-frequency items, such as corrugated shells and primary foam inserts, inside this zone. Secondary supplies like tape, shipping labels, and stretch film should occupy the outer periphery. This arrangement minimizes fatigue and keeps the assembly rhythm steady throughout a full shift.
Organizing Kit Components for High-Volume Flow
Managing the bulk nature of packaging materials requires a strategic floor plan. We recommend using gravity-fed racks for corrugated flats and foam components. This ensures that as one piece is pulled, the next slides into the Golden Zone. Implementing a First-In, First-Out (FIFO) system is also vital to prevent older corrugated stock from becoming brittle or absorbing excess warehouse moisture. To eliminate shipping bottlenecks caused by material shortages, many manufacturers coordinate with a professional VMI provider. This ensures your assembly lines never stop due to a stockout of custom inserts or boxes. If you are struggling with warehouse congestion, you might want to request a packaging quote for pre-staged components to save on-site floor space.
Industrial Tools Required for Professional Assembly
The right tools transform a slow manual process into a professional production line. High-tack industrial adhesive tapes paired with ergonomic, heavy-duty tape dispensers are non-negotiable for securing double-wall containers. For kits requiring permanent foam-to-box bonding, industrial heat guns or specialized hot-melt applicators provide a bond that won’t fail during the temperature fluctuations of a long-haul transit. Finally, using fixed-mount label applicators ensures that every shipping label or “Fragile” warning is placed in the exact same location. This consistency isn’t just about aesthetics; it ensures that automated scanning systems in the logistics chain can process your high-value goods without delay. Understanding how to assemble custom packaging kits with these tools ensures a level of precision that manual methods simply cannot match.
Step-by-Step: How to Assemble Custom Packaging Kits
The physical execution of your packaging design determines whether a high-value product survives the rigors of the logistics chain. Even the most advanced materials fail if the assembly is inconsistent or rushed. When training operators on how to assemble custom packaging kits, focus on a repeatable sequence that prioritizes structural integrity and zero-movement internal environments. This standardized approach ensures that every kit leaving your dock provides the same level of protection, regardless of who is working the station.
Step 1: Constructing and Sealing the Corrugated Shell
Start by squaring the corrugated box to ensure the internal dimensions (ID) perfectly match your custom foam inserts. If the shell is out of square, the internal dunnage will not sit flush against the walls, creating structural weak points. For kits exceeding 30 lbs, we recommend using reinforced water-activated tape or heavy-duty industrial adhesive to prevent bottom-blowouts. Standardizing this bottom-seal process is vital to ensure the base can support the full kit weight during vertical stacking. If your facility handles high-volume runs, leveraging PFI’s manufacturing packaging services can provide pre-scored, heavy-duty containers that simplify this initial construction phase.
Step 2: Integrating Custom Foam and Protective Liners
Once the shell is secure, insert the base foam pads to create a shock-absorbing foundation. You must verify foam orientation at this stage. Ensure the softest side or specific die-cut cutouts face the product. Perimeter liners or die-cut inserts should then be slid into place, making sure they are flush against the corrugated walls to prevent the product from shifting laterally. For ESD-sensitive electronics, double-check that the anti-static foam is positioned correctly to maintain a continuous protective circuit around the component. This systematic approach to how to assemble custom packaging kits eliminates the risk of human error during high-speed pack-out operations.
Step 3: Component Loading and Final Closure
Place the components into their designated foam cutouts or partitions. After loading, add top foam caps or convoluted foam sets. These final layers are designed to eliminate vertical movement, which is a primary cause of transit damage. Before closing the flaps, perform a “snug fit” check; there should be zero movement when the kit is shaken. Finalize the seal using an H-tape pattern, which involves taping the center seam and both end seams. This pattern provides maximum structural integrity and prevents the flaps from flagging during transit. Finally, apply shipping labels and any required “Fragile” or “This Side Up” indicators in consistent, highly visible locations.
Optimizing Assembly Speed and Quality Control
Speed shouldn’t compromise safety. Once you’ve mastered how to assemble custom packaging kits, the focus shifts to removing friction from the assembly line. Implementing a “Visual Management” system is one of the most effective ways to achieve this. By using custom foam inserts with specific cutouts for each component, any missing part becomes immediately obvious to the operator. This reduces the cognitive load on your staff and ensures no kit leaves the station incomplete. This shadow-board approach turns a complex pack-out into an intuitive process.
Balancing manual labor with semi-automation is another key to long-term efficiency. While manual assembly is flexible, semi-automated tape dispensers and stretch film applicators can significantly increase throughput for high-volume runs. We recommend tracking the “Time per Kit” metric to identify specific bottlenecks in your workflow. If a particular step consistently takes longer than others, it may indicate a need for a station redesign or specialized tooling. To verify that your speed optimizations haven’t compromised protection, conduct periodic “drop tests” on fully assembled kits. This confirms they still meet the original engineering specifications under real-world stress.
Common Assembly Mistakes and How to Avoid Them
- Over-taping: Operators often use excessive tape thinking it adds security, but it actually increases waste, labor costs, and shipping weight. Solution: Use standardized tape lengths and pre-set dispensers to ensure consistency.
- Incorrect foam orientation: Even with a guide, errors happen during high-speed shifts. Solution: Use color-coded foam or directional markings to make the correct orientation self-evident.
- Loose components: If parts rattle within the box, the kit is failing. Solution: This often indicates a design flaw or material fatigue. Re-evaluate the custom design with your packaging partner to tighten tolerances and improve fit.
Implementing a Final QC Checklist
Standardizing the final check ensures that every shipment meets your engineering requirements. A final QC checklist is the most reliable way to maintain standards as you teach new team members how to assemble custom packaging kits. Every kit should undergo a 1:1 visual match with the foam cutouts before closure to prevent missing components. Beyond part presence, check for clean, non-obstructed barcode placement to ensure seamless warehouse scanning and tracking. Finally, inspect the outer carton for any punctures or crushed corners that may have occurred during the kitting process. Only after these boxes are checked should the kit be palletized for shipment.
Scaling Your Kitting Operations with PFI Managed Solutions
As your production volume increases, the management of individual packaging SKUs often becomes a logistical burden. Transitioning from “ordering parts” to “managing a kitting program” with a professional partner allows you to shift your focus back to core manufacturing. By leveraging PFI’s Southern California footprint, you gain access to local next-day delivery across Orange County, Los Angeles, San Diego, and the Inland Empire. This proximity is vital for maintaining a Just-In-Time (JIT) delivery schedule, which reduces your on-site inventory footprint and frees up valuable warehouse floor space for revenue-generating activities. We recommend requesting a professional packaging review to identify where consolidated kitting can lower your total shipping costs and improve your bottom line.
One of the most effective ways to scale is through Vendor Managed Inventory (VMI). Instead of tracking stock levels for boxes, foam, and tape separately, a VMI program ensures that complete kit components are always ready for your assembly line. This proactive approach eliminates the professional stress of stockouts and allows for a more predictable logistical flow. When you outsource the initial stages of production, your team no longer needs to worry about the technical details of how to assemble custom packaging kits from scratch, as the components arrive pre-staged and ready for immediate pack-out. For companies looking to extend this efficiency to their final distribution, you can discover Pik Pak Logistics to see how professional 3PL services manage high-volume kitting and order fulfillment.
The Benefits of Pre-Assembled Kits vs. Component Delivery
For operations facing labor shortages or tight shipping windows, receiving pre-assembled components offers a significant competitive advantage. We can provide pre-glued foam-to-box assemblies that remove several manual steps from your workflow. This reduction in labor overhead is especially beneficial for high-complexity builds where manual error rates tend to climb. Evaluating PFI’s packaging kitting services allows you to receive ready-to-use units, effectively cutting your pack-out time in half. This strategy doesn’t just save time; it reduces warehouse floor clutter and the administrative cost of managing multiple vendors for a single protective solution.
Custom Kitting for Specialized Industries
Different sectors require different engineering tolerances. In the high-stakes world of aerospace packaging, precision kits must meet strict military or flight-ready specifications to ensure sensitive instrumentation remains calibrated during transit. Similarly, managing automotive supply chain demands requires high-durability kits that can withstand the weight of heavy metal components without failing. Each industry has unique challenges, but the fundamental goal remains the same: protection and efficiency. If you’re looking to optimize your current process, contact us for a custom packaging quote. Our team can help you refine how to assemble custom packaging kits for your specific application, ensuring your high-value goods reach their destination in perfect condition.
Streamline Your Industrial Pack-Out Operations
Mastering how to assemble custom packaging kits transforms your warehouse from a bottleneck into a high-efficiency engine. By standardizing the integration of heavy-duty corrugated shells with precision foam inserts, you eliminate the variability that leads to shipping damage. A Lean workspace and a clear quality control checklist ensure that every kit leaving your dock meets the strict engineering requirements of sectors like aerospace, medical, and electronics manufacturing. These systematic improvements reduce labor hours and guarantee that high-value goods remain secure throughout the logistics chain.
Scaling these operations doesn’t have to increase your administrative burden. Transitioning to a managed program with local next-day delivery across Orange County, Los Angeles, and San Diego allows you to maintain minimal on-site inventory while ensuring supply reliability. We provide free prototyping for all custom designs to guarantee a perfect fit before you commit to a full production run. This proactive approach ensures your packaging is as precisely engineered as the products it protects.
Your team’s efficiency and your product’s safety are the foundations of a reliable supply chain. We look forward to helping you optimize your packaging process and lower your total operational costs.
Frequently Asked Questions
What is the difference between kitting and simple packaging?
Kitting involves an integrated system of multiple components, such as custom foam inserts and corrugated partitions, designed to work together for a specific SKU. Simple packaging usually refers to a single material, like a standard box with loose-fill. Kitting ensures a zero-movement environment, which is critical for high-value industrial parts that require precision protection and a professional presentation during transit.
How do I choose the right foam density for my packaging kit?
You choose foam density based on the weight and fragility of your product. Polyethylene (PE) is a high-density, closed-cell foam used for heavy items that need structural support and shock absorption. Polyurethane (PU) is a lower-density, open-cell foam ideal for cushioning lightweight, fragile electronics. We provide free prototyping to test different densities, ensuring your kit components prevent bottoming out during the shipping cycle.
Can I use custom kits for international shipping (ISPM-15)?
Yes, custom kits can be designed for international compliance by integrating ISPM-15 certified heat-treated pallets or crates. While the corrugated and foam components of the kit don’t require certification, the wooden platforms they sit on must meet global phytosanitary standards. We specialize in engineering these multi-material kits to ensure your international shipments pass through customs without regulatory delays or unexpected fines.
How does kitting improve production line efficiency?
Kitting improves efficiency by reducing the number of individual components an operator must manage at the pack-out station. When you standardize how to assemble custom packaging kits, you eliminate the travel time spent searching for loose dunnage or cutting foam to size. This organized approach creates a repeatable workflow that speeds up throughput and significantly reduces the labor hours required per shipment.
What information do I need to provide for a custom kit quote?
To provide an accurate custom kit quote, we need the exact dimensions and weight of your product, its fragility rating, and your monthly shipping volume. Knowing the transit method and storage conditions also helps us select the right board grade and foam type. This data allows our engineers to design a kit that balances material costs with maximum protection for your specific industrial application.
Is it cheaper to assemble kits in-house or buy them pre-assembled?
The choice depends on your internal labor costs and available warehouse space. Assembling in-house can lower material costs but increases labor overhead and requires more floor space for bulk components. Buying pre-assembled kits reduces your on-site footprint and allows your team to focus on production. Many manufacturers find that pre-assembled kits are more cost-effective when accounting for the total cost of ownership and assembly speed.
How do I prevent shipping air and reduce dimensional weight charges?
You prevent shipping air by right-sizing the outer corrugated shell to the exact dimensions of the internal components. Engineered kits eliminate the need for excessive void fill, which reduces the overall footprint of the package. This precision design helps you avoid dimensional weight surcharges, which can significantly lower your total shipping costs for high-volume shipments where how to assemble custom packaging kits efficiently is a priority.
Does PFI offer local delivery for kit components in Anaheim or Irvine?
Yes, we provide local next-day delivery across Orange County, including Anaheim and Irvine. Our Southern California footprint also covers Los Angeles, San Diego, and the Inland Empire. This proximity allows you to utilize Just-In-Time delivery for your kit components, which minimizes your on-site inventory needs and keeps your production lines moving without the risk of stockouts or long lead times from distant suppliers.