
A precision-machined part can be damaged by movement inside a package that arrives intact. Packaging for complex machined components protects parts by matching cushioning and restraints to their geometry, weight, surface finish, and freight risks. The goal is to limit shifting, impact, and contact between components throughout transit.
Protecting a part takes more than adding filler around it. Dense or irregular components may need shaped cushioning or individual separation, while the outer package must suit the shipment and stacking conditions. Clear handling instructions and organized documentation also help communicate requirements from dispatch through receiving.
This guide explains how to assess part geometry, select cushioning, and account for shock, vibration, moisture, and handling. It also covers how packaging instructions, labels, and compliance documents support a smoother handoff, and where custom design, foam packaging, and kitting can fit into a reliable shipping process.
Key Takeaways
- Match the package’s restraint and protection to the part’s weight, geometry, finish, and transit conditions.
- Choose cushioning that limits movement and surface contact instead of relying on loose fill alone.
- Consider how shock, vibration, moisture, stacking, and package weight can affect parts in freight transit.
- Use clear handling instructions and organized documentation to support a smoother receiving handoff.
- For ongoing packaging needs, PFI’s foam packaging, stretch film, VMI, and JIT inventory management can help align supplies with operations.
How does custom packaging protect precision machined parts during freight transit?
Custom packaging protects precision parts by limiting movement, separating components, and cushioning impact. The design should reflect each part’s geometry, weight, surface finish, material, and shipping conditions.
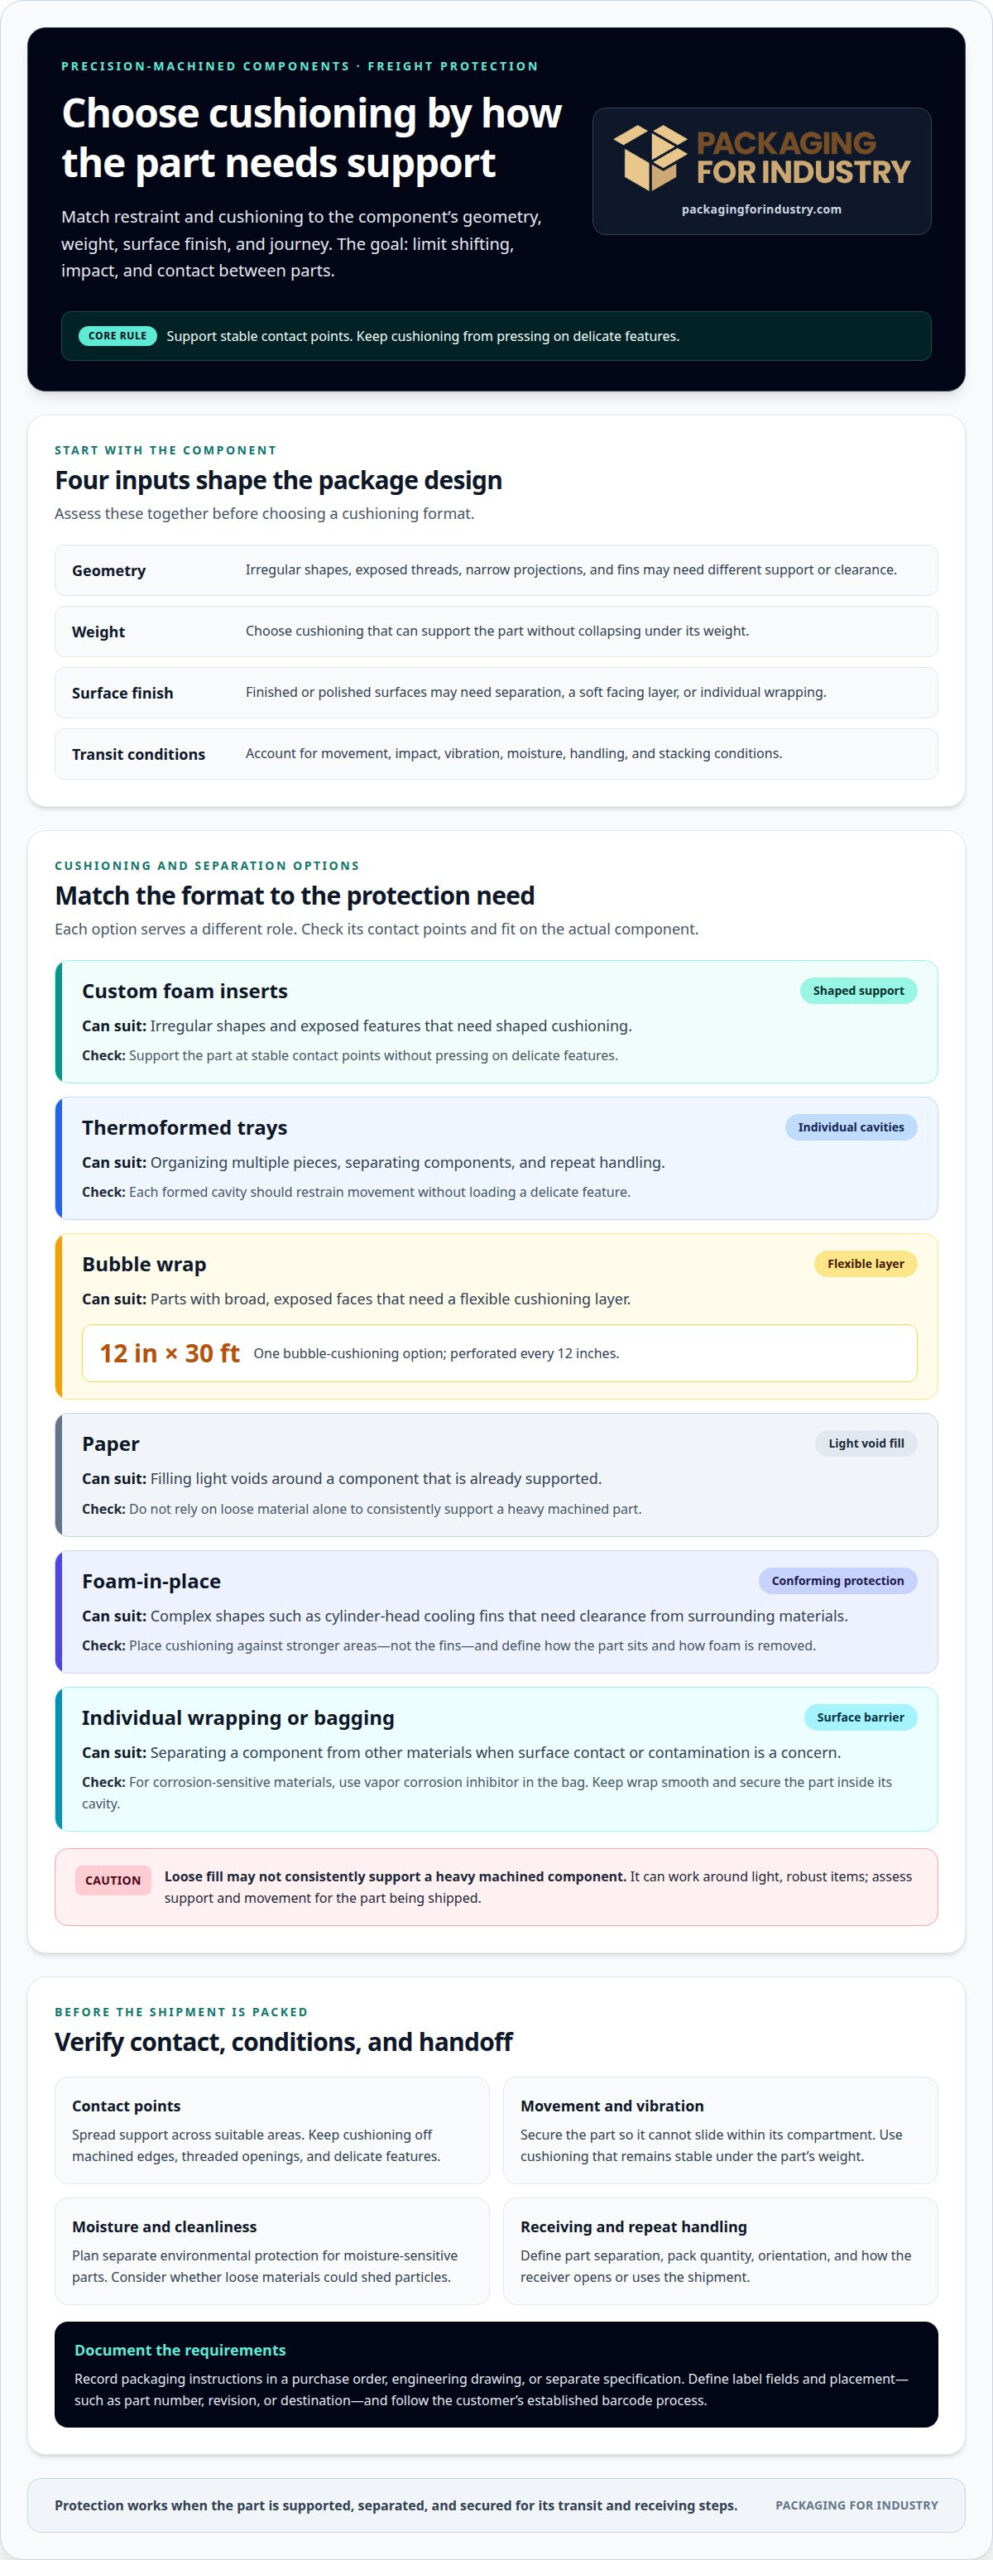
A machined component may have exposed threads, narrow projections, or finished surfaces that need different support. A fitted cavity holds the part in place and keeps metal surfaces from contacting neighboring components. For example, a tray can separate several machined pieces while supporting each at stable contact points. Individual spaces also make parts easier to remove and identify at receiving. This is the core of packaging for complex machined components: match protection to the part and its freight journey.
Custom Foam Inserts and Thermoformed Trays
Custom foam inserts can support irregular shapes and cushion exposed features, while thermoformed trays hold parts in formed cavities. The right choice depends on part geometry, surface sensitivity, handling sequence, and the need for individual separation. Foam may suit a part that needs shaped cushioning; trays can organize multiple pieces for repeat handling. Evaluate how each format restrains movement without pressing on delicate features.
Individual wrapping or bagging creates a barrier between a part and other materials. Bag each component before placing it in a foam cavity or tray when surface contact or contamination is a concern. Corrosion-sensitive materials may need vapor corrosion inhibitor in the bag. Keep the wrap smooth around finished surfaces, then secure the part so it cannot slide within its compartment during transit.
Customer-Specific Packaging Requirements
Packaging requirements can specify part separation, pack quantity, orientation, cushioning, and how the receiver opens or uses the shipment. A purchase order, engineering drawing, or separate packaging specification can record these instructions. For repeat orders, a consistent format helps align each shipment with the customer’s receiving and production process. Custom barcoding and label formatting can also match the customer’s part identification and routing workflow.
Design and fabrication, specialized materials, packing labor, and material sourcing all affect custom packaging costs and schedules. Complete 3D CAD files or physical samples help define the fit; initial prototypes typically take several business days after engineers receive them. Reviewing pack quantities, label fields, and handling steps early helps reduce design changes and avoid adding requirements during production.
Define the required fields and placement before finalizing the package format. A label might display a part number, revision, or destination so receiving staff can identify and route the shipment. Barcodes should follow the customer’s established identification process. Place each label where it remains visible after packing and does not cover handling instructions or interfere with opening.
For ongoing production programs, consider reusable trays or other reusable packaging solutions. Their practicality depends on return logistics, cleaning needs, storage space, and how consistently the same parts travel between locations. Right-sized cavities also avoid adding material that does not support or separate the component. Choose a format that works for both transit protection and the shipment’s next handling step.
Protective cushioning with bubble wrap, foam, packing fill, or paper
For delicate surfaces, threads, or sharp edges, choose cushioning based on how it absorbs impact and distributes pressure. Foam offers shaped support, while bubble wrap, paper, and packing fill suit different gaps and contact areas.
Cushioning Material Options
Bubble wrap provides a flexible layer for parts with broad, exposed faces; paper can fill light voids around a supported component. One bubble-cushioning option measures 12 inches by 30 feet and is perforated every 12 inches, which can simplify packing at a workstation. Foam works where a part needs more structured support. Choose based on the weight carried by the cushion and the space available inside the package.
Foam-in-Place Protection
Foam-in-place protection can conform around a complex shape, making it useful for cylinder-head cooling fins that need clearance from surrounding materials. The package layout should place cushioning against stronger areas of the component, not load the fins. For production packing, define where the part sits and how the foam is removed so operators can pack and unpack consistently.
Surface, Thread, and Edge Protection
Cushioning should spread contact across a suitable support area rather than concentrate force on a machined edge. For a threaded port, position the part so surrounding cushioning does not press directly on the thread opening. A soft facing layer can reduce abrasion where cushioning contacts a finished surface. Review contact points on the actual component, since a sharp flange edge and a polished face need different support.
Vibration, Corrosion, and Contamination Protection
Vibration repeatedly loads cushioning during transport, so select material that absorbs movement without collapsing under the part’s weight. A delicate assembly with projecting fins needs support that remains stable during handling. Cushioning alone does not prevent corrosion, so moisture-sensitive components need a separate environmental protection plan. Also consider whether loose paper or fill could shed particles near a clean machined surface during packing and unpacking.
Loose-fill packing can work around light, robust items, but may not consistently support a heavy machined component. Instead, plan cushioning layers around the component’s contact areas and the package’s empty spaces. For instance, a paper layer can separate a broad face from a carton, while firmer foam carries the load. This layered approach matches protection to the part without relying on one material for every function.
For a production run, document the cushioning arrangement with a simple packing diagram or sample pack. That gives operators a repeatable method and helps purchasing maintain the intended material format. A protective packaging quote can help define cushioning for the component and its shipping conditions.
Packaging risks for precision and heavy machine parts
Heavy shipments face risks beyond surface damage: concentrated loads can deform a container, and excessive package weight can make handling difficult. Evaluate the packed unit as a whole, including the part, internal materials, outer container, and pallet or handling method.
Separating Parts During Shipping
For multi-component shipments, plan the compartment layout around each part’s mass and the package’s load distribution. A dense component placed beside lighter pieces can create an uneven load, especially if the shipment is tilted or stacked. Arrange the contents so heavier items do not bear down on delicate neighboring components. This also helps operators unload the package in a controlled order instead of lifting across unstable contents.
Pack quantity matters, too. A larger count can change how the package carries weight and how staff handle it. Keep the component arrangement consistent with the intended unloading sequence, particularly when one shipment supplies several assembly stations.
Packaging Material Selection
Select the outer container based on the packed load, not just the machined part’s dimensions. Total weight includes the component and all packing materials. If the package becomes difficult to move, handling damage can occur before the freight reaches its destination. Review how it will be lifted, stacked, and transferred between vehicles or warehouse areas.
Packaging materials also need to work together under load. A container may look adequate while empty but perform differently once its contents press against its panels. Consider where the weight bears on the base and whether the planned stacking arrangement adds pressure from above. These checks help identify weak points before routine production packing begins.
Protective Packaging for Heavy Parts
Heavy parts can overload a package when their mass sits over a small area. For example, a compact steel component may put more stress on the carton base than a larger, lighter assembly. Distribute the load through the package design and account for how handlers will move the packed unit. Avoid unnecessary packaging weight, since an overly heavy package can be harder to handle and more likely to fail in transit.
Use a test plan that reflects the actual shipment configuration. A sample package should contain the intended part and packing materials, then be evaluated under handling conditions that could expose weak points. Record any deformation, closure failure, or change in package stability, and revise the design before production use. Testing an empty carton will not show how the component’s mass affects performance.
For recurring freight, review damage records alongside package changes. If failures appear after a route, load, or component revision changes, reassess the package for that specific condition. This connects packaging decisions to actual shipment outcomes without assuming a design proven for one load suits every machined part.
Handling instructions and compliance documentation
Handling marks and shipment records help carriers and receiving teams manage machined components as intended. For an industrial shipment, align the outer labels, packing documents, and inspection records with the part and its next manufacturing or assembly step.
Use external markings such as “fragile” or “open this side up” to make handling requirements visible. These instructions communicate important information, but they do not replace sound packing or secure closure. If a part may buckle under weight, state that clearly so receivers know not to stack other items on it. Place marks where they remain visible after pallets are wrapped or grouped for transport.
Shipping documentation should identify the package contents and support receiving. A packing list can connect part numbers and quantities to the shipment, while labels can direct components to a work order, assembly area, or inventory location. Keep the details consistent across the package and accompanying records. A mismatch between a part label and packing list can delay identification, sorting, and production use.
Inspection reports provide evidence of a component’s condition before dispatch. For machined parts, dimensional measurement reports can record checked features, while treatment certificates and lot traceability records document other shipment-specific details. Keep records associated with the correct part and lot. This helps receiving teams connect a delivered component with its inspection history without confusing similar parts or revisions.
For assemblies, functional testing can complement dimensional checks. A CNC and assembly supplier may verify an assembly through dimensional checks and functional testing before delivery. Documentation can identify the tested assembly and retain relevant results for receiving. These records are especially useful when related components arrive together and must be routed to different manufacturing stages.
Compliance labels may include standards such as ISO 9001 or AS9100D. Treat these as identification or certification references, not as a substitute for the specific inspection and traceability records required for a shipment. The label, report, and lot information should refer to the same product or assembly. Clear alignment helps prevent a receiving team from associating a certificate with the wrong component.
- Match package markings to the actual handling risk, such as fragile features or a part that cannot bear stacking weight.
- Align part identifiers across labels, packing lists, measurement reports, and lot records.
- Include dimensional or functional test records when they apply to the delivered component or assembly.
A consistent documentation method makes receiving, inventory entry, and assembly routing easier to manage. For example, a shipment divided by work order can use matching package labels and packing-list entries, allowing receiving staff to route each group without opening and sorting every container.
Matching packaging to part geometry and handling needs
Package design should reflect a component’s geometry, material, weight, finish, and destination. These factors determine how the part is supported, identified, and moved through receiving or production.
Start with the part’s contact points and vulnerable features. A shaft with a narrow end needs support that prevents bending or impact at that end, while a housing with broad, flat faces may need protection from abrasion and stacking pressure. Keep protective supports away from critical fits and surfaces. For parts with tight tolerances, controlled positioning also helps limit contact that could affect inspection or assembly.
Weight changes the support required. A 40-pound steel spindle can shift inside a standard box, so its package needs secure restraint rather than extra empty space filled with loose material. By contrast, lightweight aluminum fittings, small valves, and low-density parts can be arranged in multi-cavity trays. Single-wall corrugated rated at 200# to 275# test is described as suitable for those lightweight parts. The part type and load distribution matter more than a one-size-fits-all box choice.
Packaging approaches also depend on shop size and production flow. A small machine shop shipping individual parts may prioritize simple packing steps and clear part identification. A larger operation sending repeat production releases may benefit from consistent pack formats grouped by assembly or work order. For complex parts, 3D CAD models in .STEP or .IGES format can help packaging engineers design protective cavities around the actual geometry.
Reduce missing-part errors by organizing related components for their next handling step. Kitting can group machined parts, hardware, and subassemblies around a specific assembly or work order. A clearly labeled kit helps receiving staff route items together instead of sorting loose components. Keep the packing list, package label, and kit contents aligned so documentation identifies what should be present and where it belongs.
Build special handling needs into both the package and its instructions. Mark orientation when a component must remain in a particular position, and identify fragile features that cannot support other items. For mixed shipments, separate kits by destination or work order, then label each package accordingly. This gives warehouse staff a practical way to handle each group without mixing similar parts or interrupting production.
Match the package to the full route, including internal transfers, freight handling, and receiving. A design that protects the part but slows safe removal can create extra work at assembly. Consistent formats, legible labels, and clear handling instructions support repeat shipments while helping reduce avoidable sorting and damage.
Packaging For Industry (PFI)
Packaging For Industry (PFI) supports manufacturers in Orange County, Los Angeles, and San Diego with packaging solutions. Its Foam Packaging and Stretch Film offerings can fit shipping and production workflows, while Vendor Managed Inventory (VMI) for Packaging helps coordinate recurring supply needs. This practical, industrial focus suits aerospace, electronics, medical, and machinery businesses working to reduce damage and simplify purchasing.
For manufacturers, PFI can discuss custom sizes suited to a component or workflow, along with supply needs for repeat orders. Buyers can compare packaging pricing and consider bulk packaging costs in relation to order requirements and inventory practices. PFI is a relevant partner when standard packaging does not fit the part or purchasing process.
Contact Packaging For Industry (PFI) to discuss packaging requirements for your components.
Make Packaging Part of the Next Production Release
Treat packaging as a working part of the production plan, not a final shipping task. When a component changes, revisit its packaging specification alongside the drawing, revision, or assembly sequence. This keeps the chosen format aligned with current handling needs and helps prevent outdated instructions from carrying into later shipments.
For packaging for complex machined components, make the requirements actionable: document the intended pack format, part identification, and receiving workflow in a form purchasing and operations can use. That shared reference gives teams a consistent basis for future orders and helps surface packaging issues before they disrupt a release.
Discuss your component and packaging requirements with PFI to identify a practical next step.
A clear packaging plan supports smoother handoffs from the shipping dock to production. Start with the requirements that matter most to your operation and build from there.
Frequently Asked Questions
How does custom packaging reduce part damage?
Custom packaging reduces damage by supporting a component at stable points and limiting unwanted contact. A machined housing with projecting ports, for example, needs internal clearance around those features while its main body stays restrained. The package should suit the shipment’s handling route and receiving process, too. A well-matched design helps protect the part without forcing staff to remove excess material or handle it awkwardly.
What packaging materials protect complex machined components from impact and vibration?
Foam, bubble cushioning, paper, and corrugated packaging can work together to manage impact and vibration. Use shaped foam or a fitted insert where a part needs stable support, and flexible cushioning as a protective layer around less exposed surfaces. The outer container must suit the shipment’s handling conditions. Select materials based on the component’s weight, geometry, finish, and need for additional separation or moisture protection.
How should machined parts be packaged to prevent corrosion and rust?
For corrosion-sensitive parts, place each clean, dry component in an individual bag with vapor corrosion inhibitor, then secure it inside protective packaging. Keep the bag intact and avoid packing materials that introduce moisture or contaminants. The right barrier depends on the part material, storage conditions, and shipping route. For shipments with prolonged transit or changing environments, include moisture protection in the package design.
What are typical costs for custom packaging for machined components?
Custom packaging costs depend on design, materials, fabrication work, packing labor, and order volume. A single irregular component may need a different solution from a repeat shipment using a common format. Specialized materials and prototypes can also affect project cost and timing. Pricing depends on the requirements and is provided after a quote request, once packaging needs and quantities are defined.
What packaging standards apply to shipping precision-machined components in the United States?
Packaging requirements should follow the customer’s specifications, purchase order, and shipment needs. ISO 2244 is an impact-test standard cited for evaluating packaging used to ship machined parts. ISO 9001 and AS9100D may appear as certification references on compliance labels, but they are not impact-test methods. Distinguish package performance testing from supplier or quality-system documentation when preparing shipment records and markings.
How should machined components be packaged for domestic and international shipping?
For either route, secure the component against movement and choose an outer package suited to its weight and freight handling. International shipments may need additional cushioning, moisture barriers, or materials suited to longer transit and varied handling conditions. Consider how the package will be stored and opened at its destination, too. Clear labels and a matching packing list help receiving teams identify parts without unnecessary unpacking or sorting.
What packaging methods prevent parts from moving or contacting each other in transit?
Use separate cavities, dividers, trays, or fitted supports to keep components from touching. Each part should sit securely without pressure on delicate features. For a mixed kit, assign components to individual compartments and keep hardware in its own labeled space. Gently move the completed pack to check for shifting; audible or visible movement signals that restraint or cushioning needs adjustment before shipment.
How should packaging protect machined components from moisture, dust, and contamination?
Use a clean inner barrier, such as individual bags, to keep dust and handling residue away from machined surfaces. Seal the protective layer before placing the part in its outer package, and keep the packing area clean during assembly. If moisture is a risk, select a suitable barrier for the route and storage conditions. Keep labels and handling marks outside the protective layer for clear identification.